Best Practices for Installing JFrog Xray

NOTE: This blog post refers to JFrog Xray v1.x. For information about the current release of Xray, please see this knowledge base article.
JFrog first released Xray in July 2016, and the response was phenomenal. Customers were very excited about the ability to hook up their Artifactory repositories and have Xray automatically do a deep recursive scan of their artifacts to weed out issues and vulnerabilities. Now, after several months, with the diverse experience and feedback from the many customers who installed it, we’d like to share some best practices that will help you get started with Xray. This post assumes you have some familiarity with Xray, so if you are new to scanning the artifacts in your Artifactory repositories, you might want to start with our first blog post about Xray to get familiar with it.
Microservices: Great Things Come In Small Packages
Xray is architectured as a system of nine microservices. There’s the Installer microservice, which when invoked, spins up five Xray internal microservices and three third-party ones (RabbitMQ, MongoDB, and Postgres).
The central microservice is the Xray Server. It listens to all incoming requests from Artifactory and external services on port 8000 and pulls in vulnerability and component data from the cloud from jxray.jfrog.io and dl.bintray.com.
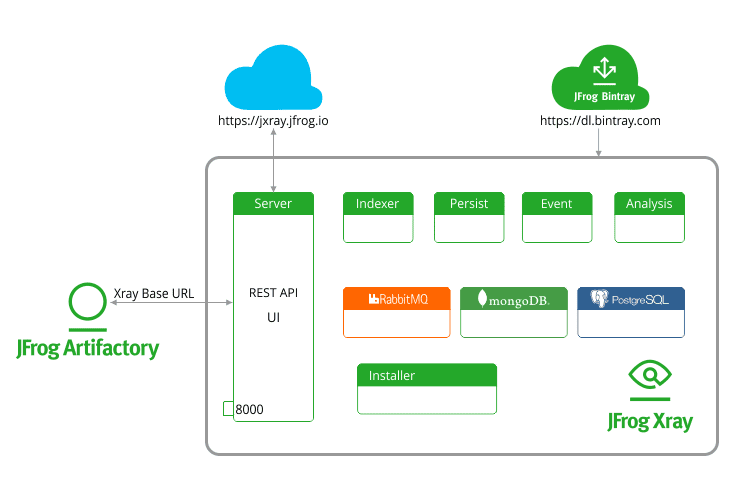
The connection to these URLs is required for online data sync. Xray can also be configured to talk to these URLs via a proxy server. However, if your company’s security policies mandate production systems to be fully isolated from the external network, you should use offline sync.
Here are three ways to make the installation process smoother:
Boost CPU Intensive Processes with More Compute Power
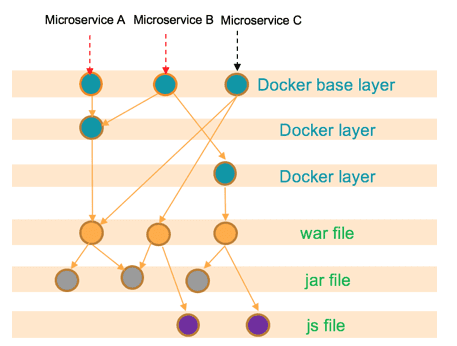
Xray does a deep recursive scan of artifacts to index them together with all their dependencies. This ensures that all binaries are picked up for analysis even if they are embedded deep within a complex component structure. In this process, a component graph that includes the correlation between all indexed binaries is created. This operation is compute intensive, and depending on the size and complexity of an artifact, the compute requirement varies. For example, a Docker image may have few “jar” and“js” files within a “war” file, all of which reside in a “tar.gz” file. JFrog Xray identifies each binary irrespective of the technology and the number of layers in which the binary is embedded.
So to meet the compute requirements of Xray’s deep recursive scan, we recommend the following hardware configuration for the machine on which Xray is running:
| Minimum | Recommended | |
| CPU | 8 Cores | 16 Cores |
| RAM | 16 GB | 32 GB |
| Disk | 100 GB | – |
NOTE: The high minimum disk space requirement is because Xray recursively extracts each artifact from its parent component to ensure that it identifies all binaries down to the deepest level.
Increase File-max Limits to Accommodate File Descriptors Needed for Deep Recursive Scan
During Xray’s deep recursive scan, the Xray and third party microservices create many open files quickly reaching the limit for open file descriptors. To avoid sluggishness in this process, you should increase the open file descriptor limit for Xray, RabbitMQ, PostgreSQL and MongoDB microservices by modifying the /etc/security/limits.conf file as follows:
...

xray hard nofile 100000

xray soft nofile 100000

rabbitmq hard nofile 100000

rabbitmq soft nofile 100000

postgres hard nofile 100000

postgres soft nofile 100000

mongodb hard nofile 100000

mongodb soft nofile 100000

...
If your system can handle it, then we recommend setting the open file descriptor limit to 100,000 as shown in the example above. To determine your system’s capacity for maximum number of open file descriptors you can use:
cat /proc/sys/fs/file-max
Make Sure the Xray Base URL is Set Correctly
For Xray to index and scan artifacts, it must have successful bi-directional communication with Artifactory, and that requires that the Xray base URL is set correctly. For example, https://my-group.xray.io:8000/
Installing Xray is a breeze. Whether you’re using the Docker installation or the Linux installation, it’s a matter of two or three simple commands. The three best practices we described in this post will make sure that your installation is not only easy but also smooth and highly performant.
Below are two useful screencasts highlighting JFrog Xray best practices: how to set the open file descriptor limit, and how to use Xray Health Diagnostics.


